“How about you just put the kitchen where the old kitchen was?”
Every contractor that walked through the old Folk Victorian house asked me this question.
My internal gut reaction every time was “No, no, no, no, no — Just no”.
The old kitchen was in smallest room at the back of the house with only one window and the back door entered directly next to the old sink — can you say awkward?
I’ve lived in plenty of homes where everyone would squish into the tiny kitchen even though I’d made a concerted effort to create other gathering areas. It’s like a magnet. The kitchen always becomes the main gathering space.
The kitchen is the heart of a home and for me it needed to feel inspiring, calm and be beautiful.
The room I chose to be the kitchen was likely the dining room at one point as it had a built in pass through directly from the pantry. I’ll talk more about the layout next week, but what hooked me immediately were the three very large bay windows on one wall, overlooking greenery outside.
Here is how we found this room when we first saw it:
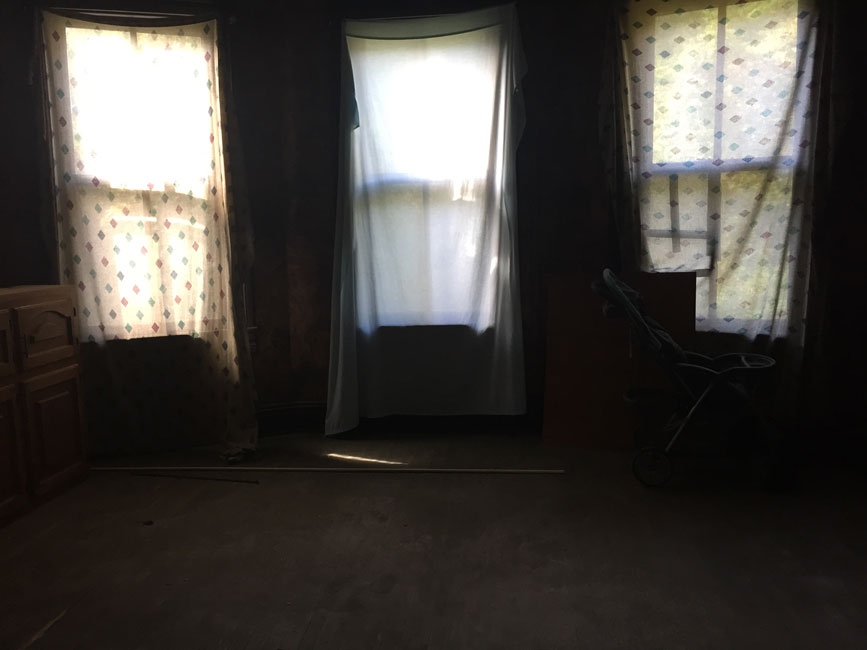
Dark, dusty and needing some vision.
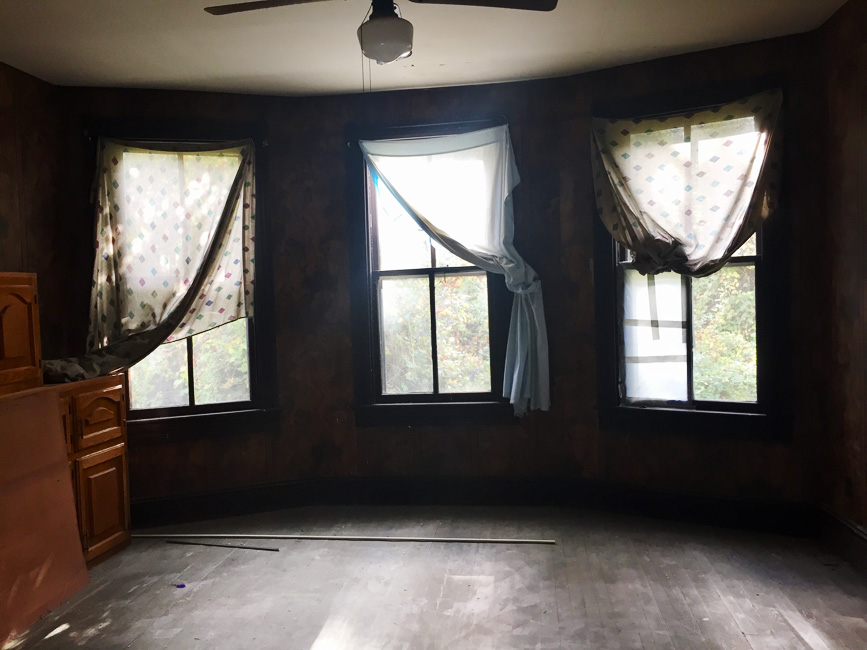
It’s easier to visualise possibility with the sheets moved 🙂

This is the left side of the room if you are facing the glorious windows, and the door leads to the front entryway. Also shown is the one of six fireplaces in this Folk Victorian home!
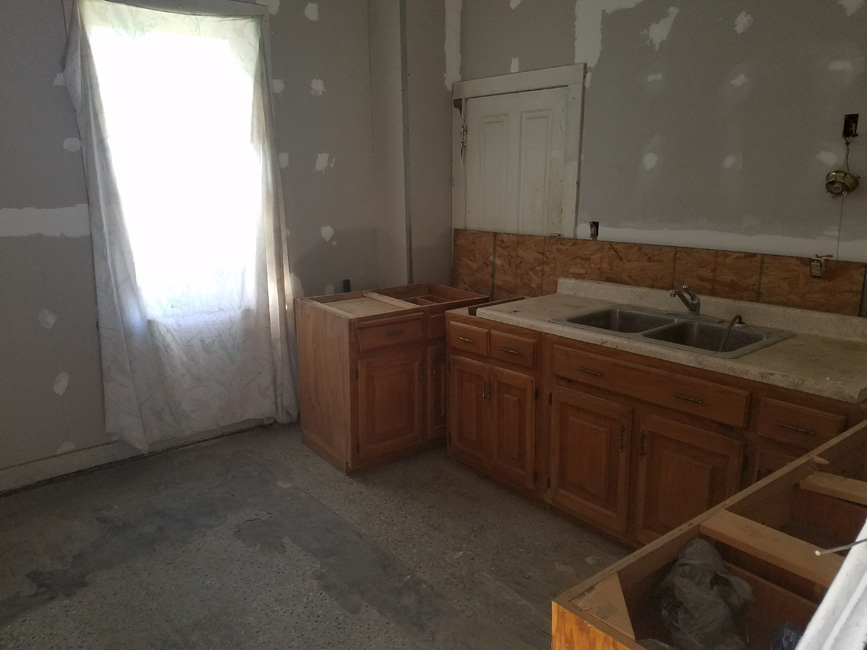
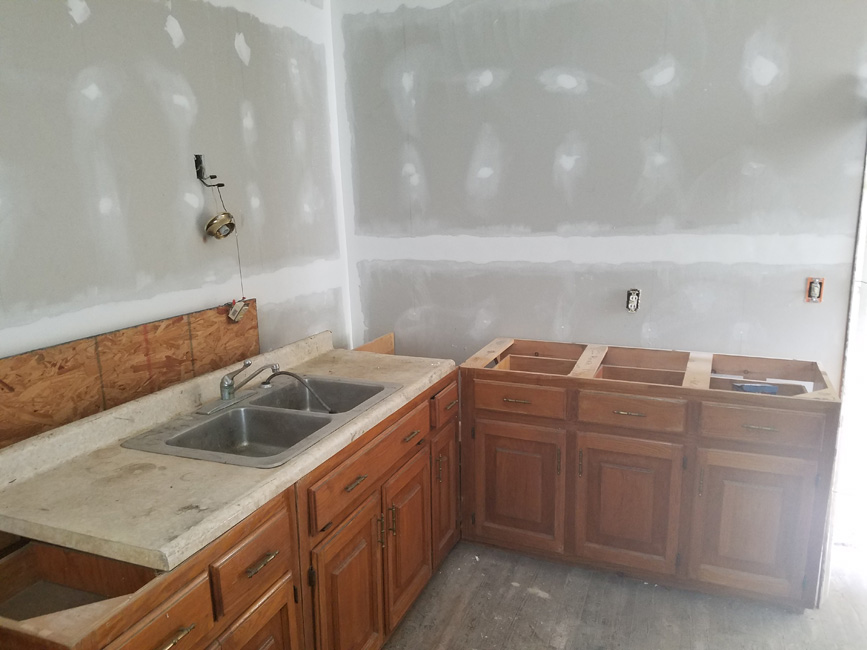
That fake wood panelling is something else, right? And yes, the previous owner had started renovating upstairs and had brought in these terrible cabinets that he was going to use in the kitchen!
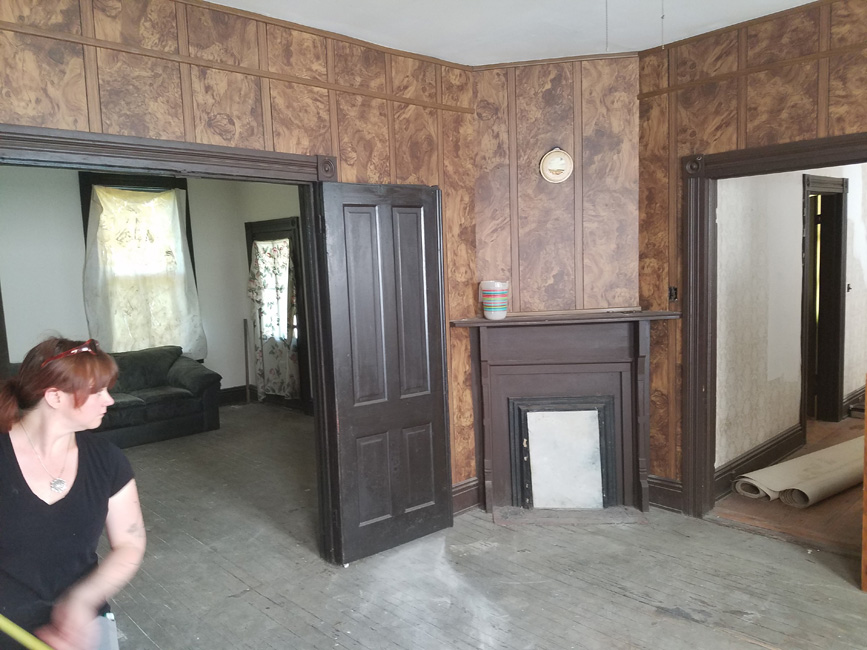
Beside the fireplace are french doors leading into the living room. Here I am measuring, before we had closed on the house!
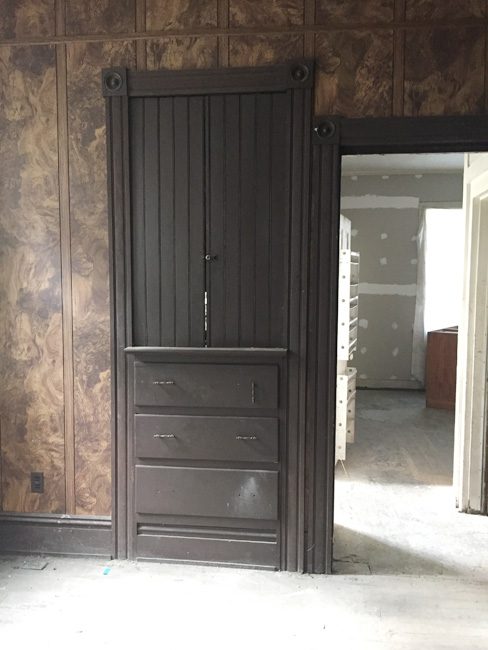
On the right side of the room is the built in pantry, with the pass through from the walk-in pantry.
I won’t go into all of the details in this post, but the only way we were able to obtain a mortgage on this property was through a renovation loan, called a 203K loan because the home had no kitchen and no heat and therefore deemed unlivable!
In order to close on this property we had to have our general contractor submit a full bid for the work, which meant I needed to design the kitchen, the bathroom, decide the full scope of work we wanted completed and choose where every single outlet, light and switch needed to go so the contractors could give us an accurate bid.
In October 2017 I designed five or six potential layouts for the kitchen and as our bids came in I revisited the design. The closing process on a 203K is extremely long as there are a lot of people and paperwork involved. January 3rd, 2018 we closed on the home and work started mid January.
The One Room Challenge
I had heard of the one room challenge, where selected designers and guests tackle one room start to finish in a six week period. I signed up on a whim yesterday as a guest challenger mostly because I had been putting off getting my website started and sharing behind the scenes progress.
Now that the end is in sight for our reno, this is the perfect time to keep on keeping on with the detail work. I’ll be showing you the kitchen and pantry over the next month or so.
Here are (some) of the inspiration photos that I gathered before starting in on the design.
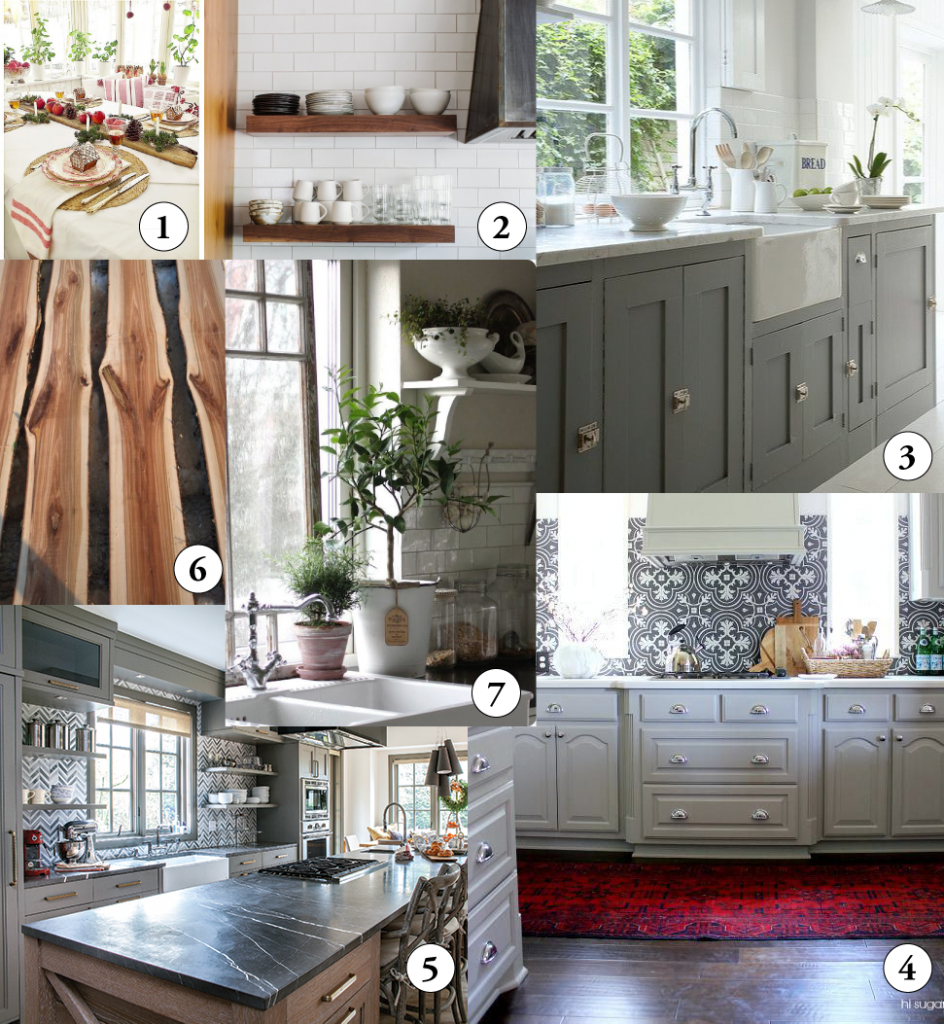
Photo Credits: 1 -Ljusa Drommar Pa Landet, 2 – Smith Hanes Studio, 3 – The Little Green.com 4 – Cassie at Hi Sugarplum 5 – Effie Genovese 6 – Unknown 7 – Lilla Blanka
Image 1: I want to pull in the Scandinavian influences with its white backdrop, plants-a-plenty and natural elements such as wood, sunlight and candles.
Image 2 & 6: Have open floating shelves like image two, but make them out of live edge wood like in image six.
Image 3: Shaker style cabinetry because of it’s simplicity and ease of cleaning. I’m very drawn to the medium dark grey so that it hides dirt, but I am considering various shades of blue cabinetry too.
Image 4: The drama of the tile and the brilliant red carpet — oh yummy!
Image 5: Dark counters and the range in the island so that you are looking at your guests as you do your last final meal prep.
Image 7: This is the feeling of calm inspiration. Can you imagine yourself standing with a glass of wine or cup of tea staring out the window at the birds?
What’s involved with our project and who’s doing the work
As we are doing a full house renovation, I’m going to detail what work went on in the kitchen.
General Contractor – Remove wood panelling, all the trim around the windows, doors (there are three) and built-in pantry.
Save wood trim to put back up.
Install drywall and mud, and bring up to paint ready.
Put wood trim back up.
Install new custom cabinets, counters, plumbing, all new electrical, hang lights and install the appliances.
Replace a couple of broken windows.
Lora and crew:
All design, colour choices, finishes and decor.
Re-do the sash cords on the windows. Fortunately my neighbour is an experienced carpenter and taught me how to rehang the weights that help the window to move.
Install lines for ductless mini-splits. My dad is a retired HVAC installer and he came down to give us guidance and help running the line sets to the 8 head units. Only one is in the kitchen. My mom and uncle also came down from Canada to give us a hand.
Prime and paint all surfaces in the interior. The house had primarily been vacant for the previous 10 years or so and every single surface needed cleaning before priming and painting. It took two of us 6 weeks to paint the ceilings, walls, windows, doors and fireplaces. There are still touch ups ongoing and I still feel a little ill when I see my “painting pants”!
For some crazy reason, my husband and I decided that we would restore the floors ourselves. The floors are a hard yellow pine, and in the kitchen and living room they were covered in glue which made sanding especially difficult in these two rooms. The grey you see on the floor is the glue. So all of the floor!
After that, stain and poly the floor.
I am making the shelves from a slab of ash along with a moveable table which becomes an extension of our island. The open shelves will be mounted so that they are floating which means you can’t see the hardware that attaches them to the wall.
Make and install pantry shelves and all items in the the walk-in pantry.
Install the backsplash.
Also whatever miscellaneous projects that are sure to come up.
Next week I’ll show you the layout options I considered, what we decided on and some progress images!
One full year later, we are in the midst of the whole house renovation, and we are very happy it’s coming to an end!
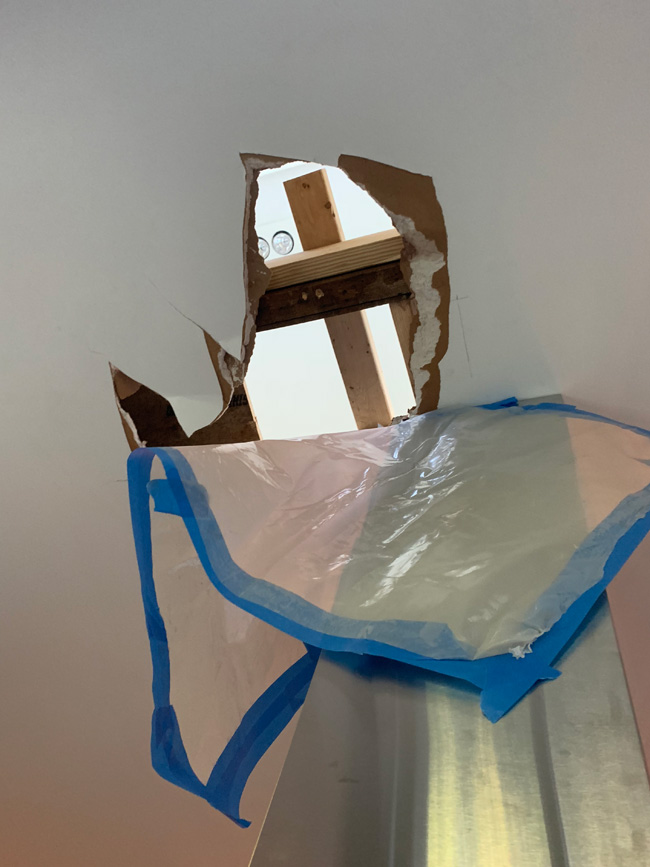
This is what my kitchen ceiling looked like this morning, and it’s nicely patched up this evening. Even with great contractors, accidents happen!
In the meantime, you should definitely check out what other designers are up to in the One Room Challenge™

Want to check out other posts in this series? Check them out here.
Week 1 – Adding a Kitchen – The Before – You just read this one
Week 2 – Kitchen Layouts and Plaster Dust
Week 3 – Electrical, Plumbing and HVAC
Week 4 – Walls, Floors and Trim
Wow! What a great project to tackle. I agree with you about the kitchen being the magnet. I can’t wait to see how you fit a kitchen into that amazing space.
Thanks Rebecca. I know the three doors, the long windows, the fireplace and the pantry certainly add a challenge!
Lora, I love a good renovation. I can’t wait to see what you do with this kitchen. You’re going to be pretty busy tackling this for the One Room Challenge but I’m sure the final space will be fantastic. I’ll be sure to follow along.
Yes, we will be busy! Thanks for following along.
Oh My Goodness! What an ambitious undertaking…I cannot WAIT to watch this unfold! Congratulations!!
This is going to be a big transformation! I can’t wait to see this kitchen transformed! I’m a featured designer in the one room challenge this season I hope I can get it all done in six weeks!!!! 🙂
Congrats, that’s awesome that you are one of the featured designers this round! I agree it will be a big transformation!
So great to see you joining in on the One Room Challenge! Yes, it is a challenge, but super fun! I am doing my 6th one! haha. This space you chose is great! Lots of work ahead, but it is such a great area for a kitchen. My kitchen is definitely the hub of my home too. Can’t wait to see what you do with it!
So smart to move the kitchen. And congrats on being gutsy – a kitchen renovation for the ORC will be amazing.
Wow! This is quite the undertaking, but I know you’re up for the job! Looking forward to following along and seeing this unfold!
This is going to look incredible when you are finished. I’m participating in the ORC for the first time and I’m so impressed with how ambitious so many of the projects are. I can’t wait to see your finished kitchen.
How exciting to see a kitchen renovation in such a short time. I love the tile you selected and that red rug. Can’t wait to follow along.
Great post. Oh the possibilities you have! I can’t wait to see how this unfolds. 🙂 The kitchen really is the heart of the home
Will definitely follow this transformation! I recognize the inspo pic you asked about; it’s from the blog Hi sugarplum! and was taken at the halfway point of her kitchen renovation. Good luck!
Thank you so much, I’ll update the credits!
What a project and I cannot wait to follow. I’m a fellow old house owner and lover.